Better Validation System in .NET Core, with examples using Vanilla Javascript and Angular
This post is a thorough guide into implementing a global error handling system in .NET for a web application. The frontend uses two examples using vanilla javascript and Angular, mainly to showcase how validation errors can be handled more elegantly using the binding capabilities of modern frontend libraries. While my example uses Angular, the concepts shown are very generic and can be applied to any other frontend libraries such as React, Vue, etc.
We’ll start be examining one of the most common forms of validations used in .NET, and why it becomes problematic as your application’s validation needs begin to grow. We’ll also look into why validations using Javascript is preferred, except for a few select scenarios.
Code samples are provided through a project in my github repo that can be downloaded, built, and run so you can easily follow along, or use as a base to start off your own app with a nice validation system built-in.
Validations on data updates are crucial for any non-trivial application. The types of validations employed can be something as simple as an Email regex check, or can become quite complex, requiring database calls and involving complicated domain logic.
We should strive to create a validation system that’s both as simple as we can make, while retaining the capabilities to perform checks that can be arbitrarily complex as needed.
We’ll start by exploring a very common validation technique employed in the .NET world, Data Annotations.
Data Annotations (and why they’re lacking)
Data Annotations, found in System.ComponentModel.DataAnnotations, are essentially attributes we can use to decorate properties in a class. For example:
public class User
{
    [Required]
    [MaxLength(15)]
    public string Name { get; set; }

    [Required]
    [MaxLength(20)]
    public string Email { get; set; }
}
If we create a Controller with a Post method, expecting a User in the HTTP request’s body:
[HttpPost]
public IActionResult Create([FromBody]User model) { }
then we get some nice automatic validations, such as both Name and Email requiring non-null values and having the lengths under the maximum as specified in the attributes.
So what’s the issue here?
They only handle the simplest of cases
What if you wanted to ensure that the Email is unique and is currently not already in use by another User in your app? There’s no simple way to incorporate all the logic of initializing a database connection, making a call, then running the checks in a simple Attribute. In any non-trivial business domain, these types of checks are going to make up the bulk of your validation code, so right off the bat, we’re going to need a more robust system in place.
Getting Started
You’ll get the most out of this walkthrough by cloning this sample project and following along:
https://github.com/rushfive/BetterValidations
The project is a very bare-bones .NET Core MVC app. It contains the backend validation system and frontend Javascript UI (both vanilla and Angular examples) that we’ll be building out in this post.
Steps to build and run
- Clone or download the repo:
git clone https://github.com/rushfive/BetterValidations.git - Install npm dependencies:
npm install - Run gulp:
gulp(download gulp if you don’t have it on your system) - Should be good to go now. Run the app from Visual Studio, or if you have the .NET Core CLI installed just run
dotnet run
What you should known
- You should have at least a small idea of how NET Core MVC applications work.
- An idea of how Dependency Injection is handled using NET Core’s IoC container. We use this to setup the service and validator later, and also to setup the global handling system.
Microsoft has fantastic documentation for NET Core here: NET Core Docs
Quick Walkthrough of the Project
I’ve split up the solution into four separate projects:
- BetterValidations is the MVC app.
- CoreAbstractions holds our Entities, and other misc abstractions that need to be referenced from all other projects.
- ServerAbstractions contains the interfaces for our services and validators.
- ServerComponents contains the concrete implementations for the interfaces above.
In the BetterValidations project, I’ve split Controllers into two sub directories, Api and View. NET Core’s done away with keeping two separate and distinct controllers as in the past. MvcController and ApiController have been combined into, simply, Controller. However, it’s a good idea to give them a separate directory to live in. It makes finding things easier and provides simple separation of concerns at the filesystem level.
The models in the BetterValidations project are confined to that project. It’s a good idea to create models for each layer of your app, and provide some form of mappings between the layers. In my projects, I have a services layer that use the Entities found in the CoreAbstractions project. In order to take a Model from the MVC Controller and pass it to the service layer for database interactions, I simply provide a static mapping method on the Model class itself like this:
public class UserAddModel
{
    public string UserName { get; set; }

    public string Email { get; set; }

    public string Password { get; set; }

    public string ConfirmPassword { get; set; }

    public static UserAdd FromModel(UserAddModel model)
    {
        return new UserAdd
        {
            ConfirmPassword = model.ConfirmPassword,
            Email = model.Email,
            Password = model.Password,
            UserName = model.UserName
        };
    }
}
I’ve seen a lot of people use complicated mapping strategies, injecting some sort of IMapper into the IoC container, and then calling some generic methods like this: IMapper.Map<TFrom, TTo>(someObjNeedingMapping).
I’m not a fan of this style. For one, since everything’s declared generically, I’ve often run into runtime errors where changing or removing a configured mapping doesn’t get caught until the method is called.
An awesome benefit of using simple static mappers, like in my example, is when you want to use Linq and a more functional approach to transforming data. For example, if you wanted to convert a List<UserAddModel> to List<User>, you can simply use:
List<User> users = userModels.Select(UserAddModel.FromModel).ToList();
It’s also more explicit and obvious how things are being mapped when you read through the codebase.
The frontend implementation for my sample project is very simple. We have an Assets folder that includes the Sass files that are processed and copied over to wwwroot by gulp. We also have some javascript, split into folder Vanilla and Angular that showcase the style of validations handling we’ll be going through. The scripts are also copied over by gulp to the correct location in wwwroot.
The usage of wwwroot varies from what I’ve seen, but ultimately it’s used as a location to store static files that are served directly. Some people use this space to directly store and modify their source or compiled frontend materials like scripts and styling files, but I like to use it as a space where we don’t manually put any files in. Rather, we have our front end build process generate any static files needed and throw them into wwwroot.
In my gulpfile.js, there’s a clean task which simply clears out wwwroot, and then a copy task which takes all our source frontend materials in the Assets folder, modifies as needed, and moves them over to wwwroot. This style of usage for the wwwroot space is more flexible if you’re going to be using any sort of CI build processes. A new build of your app should start from scratch everytime, so allowing wwwroot to be programmatically “cleaned” first, then built afterwards is a sure way of knowing your builds are only including the relevant and freshest code.
Lets take a quick peek at the Startup.cs file. There’s really not too much here, and the only section worth seeing is the ConfigureServices method:
public void ConfigureServices(IServiceCollection services)
{
    services
        .AddScoped<IUserService, UserService>()
        .AddScoped<IUserValidator, UserValidator>()
        .AddSingleton<HttpErrorFilterAttribute>()
        .AddMvc();
}
There’s 3 custom things we’ve added to NET Core’s IoC Container. The UserService, UserValidator, and HttpErrorFilterAttribute. We’ll be going over those shortly in this post.
Next, lets talk about our validation scenario and how the services layer is implemented.
Validating User Registration
Our example covers a very common use-case of validations, registering a new user for an app. The UserAddModel was already shown earlier, but here it is again for a quick view:
public class UserAddModel
{
    public string UserName { get; set; }

    public string Email { get; set; }

    public string Password { get; set; }

    public string ConfirmPassword { get; set; }

    public static UserAdd FromModel(UserAddModel model)
    {
        return new UserAdd
        {
            ConfirmPassword = model.ConfirmPassword,
            Email = model.Email,
            Password = model.Password,
            UserName = model.UserName
        };
    }
}
Notice several things here about the class.
The class name UserAddModel. I like to split my models based on their usage, I don’t have a single User model that covers all scenarios. If I’m adding something, it gets its’ own “Add” model. If I’m editing or viewing, those get their own models too. It requires a little more work up front creating the classes and mappings, but at the end of the day, it gives you more flexibility. The idea behind this is to only include what’s needed for the task at hand. Whereas a ViewModel may include almost all relevant information about a User, it doesn’t make sense for our EditModel to include all the same properties if we only allow changes to a subset of those. Ultimately all that information is passed over the wire between server and client, so we want to make sure we only pass what’s needed.
Our frontend is going to provide a simple form that allows input for the four properties. Here’s what we’ll be validating:
- All 4 properties have values, they’re required fields.
- The
UserNameandEmailare unique, they cant register using something already taken. PasswordandConfirmPasswordmust match.
Here’s the UserController that contains the POST method to receive the above model:
[Route("api/User")]
public class UserController : ApiControllerBase
{
    private IUserService userService { get; }

    public UserController(IUserService userService)
    {
        this.userService = userService;
    }

    [HttpPost("Register")]
    public async Task<IActionResult> Add([FromBody]UserAddModel model)
    {
        var entity = UserAddModel.FromModel(model);

        Guid id = await this.userService.AddAsync(entity);

        return this.Ok(id);
    }
}
Don’t worry about ApiControllerBase for now, we’ll cover that later.
IUserService, which we’ll look at next, is passed into the controller via Constructor Dependency Injection. Our UserController doesn’t care how it’s initialized, it simply receives it from the app’s IoC Container by listing it as an argument to the constructor.
In the Add method, we immediately map the UserAddModel to its Entity form. The UserService is what ultimately interacts with the database to add a user, and the service layer is setup such that it can only interact with Entities stored in CoreAbstractions. The Service Layer should never reference a web project, and consequently its’ models. Rather, it’s quite the opposite. Our MVC Web project is the consumer of the Service Layer. In order to make use of the services, it must map any frontend models into the Entities that the services understand.
The rest is pretty straight-forward. The IUserService is used to add a new user, which returns its’ new Id. Lastly, we return an HTTP Ok result with the Id as the content.
UserService and UserValidator
Lets take a peek at the UserService first since that’s what’s next in the code execution:
public class UserService : IUserService
{
    private IUserValidator validator { get; }

    public UserService(IUserValidator validator)
    {
        this.validator = validator;
    }

    public async Task<Guid> AddAsync(UserAdd user)
    {
        if (user == null)
        {
            throw new ArgumentException("User must be specified.", nameof(user));
        }

        await this.validator.ValidateAddAsync(user);

        // at this point, user is valid to add.

        // make db call to add, then return the new user id

        return Guid.NewGuid();
    }
}
Similar to the UserController, we have another object passed in via Dependency Injection and this time it’s our IUserValidator.
We have one method AddAsync which first checks that a valid UserAdd object is being passed in. It then uses the IUserValidator to run validations, then returns a new Guid. This is a simplified sample project so there’s no real interaction with a database. We’re “Faking” database calls to keep things simple.
Here’s the UserValidator:
public class UserValidator : IUserValidator
{
    public async Task ValidateAddAsync(UserAdd user)
    {
        var validationErrors = new ValidationDictionary();

        List<UserAdd> existingUsers = await UserValidator.GetAsync();

        if (string.IsNullOrWhiteSpace(user.UserName))
        {
            validationErrors.Add("UserName", "This field is required.");
        }
        else if (existingUsers.Any(u => string.Equals(u.UserName, user.UserName, StringComparison.OrdinalIgnoreCase)))
        {
            validationErrors.Add("UserName", "This username already exists.");
        }

        if (string.IsNullOrWhiteSpace(user.Email))
        {
            validationErrors.Add("Email", "This field is required.");
        }
        else if (existingUsers.Any(u => string.Equals(u.Email, user.Email, StringComparison.OrdinalIgnoreCase)))
        {
            validationErrors.Add("Email", "This email already exists.");
        }

        bool passwordExists = !string.IsNullOrWhiteSpace(user.Password),
            confirmPasswordExists = !string.IsNullOrWhiteSpace(user.ConfirmPassword);
        if (!passwordExists)
        {
            validationErrors.Add("Password", "This field is required.");
        }
        if (!confirmPasswordExists)
        {
            validationErrors.Add("ConfirmPassword", "This field is required.");
        }

        if (passwordExists && confirmPasswordExists
            && !string.Equals(user.Password, user.ConfirmPassword, StringComparison.OrdinalIgnoreCase))
        {
            validationErrors.Add("ConfirmPassword", "Doesn't match with password.");
        }

        validationErrors.ThrowIfErrors();
    }

    // for validation demo purposes we're faking
    // hitting a database and returning a list of users
    private static async Task<List<UserAdd>> GetAsync()
    {
        var users = new List<UserAdd>
        {
            new UserAdd
            {
                Email = "bob@test.com",
                UserName = "Bob"
            },
            new UserAdd
            {
                Email = "mary@test.com",
                UserName = "Mary"
            },
            new UserAdd
            {
                Email = "tom@test.com",
                UserName = "Tom"
            }
        };

        return await Task.FromResult(users);
    }
}
We have a private static method GetAsync() that’s used to fake a database call to return a list of existing users. Remember, we’re validating to ensure that Email and UserName are unique.
Next, we have the ValidateAddAsync() method, which the UserService calls to validate the UserAdd object. The code is fairly simple, it checks all four fields ensuring that they’re not null or empty (required fields), and then running the other checks we specified in the list earlier.
The main point of interest here is the usage of the custom ValidationDictionary class, copied in its’ entirety here:
public class ValidationDictionary
{
    private Dictionary<string, List<string>> internalDictionary { get; } = new Dictionary<string, List<string>>();

    public void Add(string key, string value)
    {
        if (!this.internalDictionary.ContainsKey(key))
        {
            this.internalDictionary.Add(key, new List<string>());
        }
        this.internalDictionary[key].Add(value);
    }

    public Dictionary<string, string> GetValidationResults()
    {
        return this.internalDictionary
            .Where(i => i.Value.Any())
            .ToDictionary(i => i.Key, i => string.Join(" ", i.Value));
    }

    public void ThrowIfErrors(string message = null)
    {
        Dictionary<string, string> errors = this.GetValidationResults();

        if (errors.Any())
        {
            throw new ValidationException(message, errors);
        }
    }
}
In NET MVC, the ModelState errors is handled by essentially a Dictionary of sorts. The keys are the property names of the model, and the errors are the values.
In order to return a Bad Request response, with relevant ModelState error information, we keep track of these errors by using the ValidationDictionary. Internally, it has a Dictionary<string, List<string>> where the key is the property name, and the value are a list of errors related to that property.
If a property has more than one error, we only want to send back a single string message that concatenates them like we have in the GetValidationResults() method.
The ThrowIfErrors() method should be called at the very end of your validations. It checks the internal dictionary to see if any errors have been found. If so, it throws the custom ValidationException, which is copied below:
public class ValidationException : Exception
{
    public Dictionary<string, string> ValidationErrors { get; }

    public ValidationException(string message, Dictionary<string, string> validationErrors)
        : base(message)
    {
        this.ValidationErrors = validationErrors;
    }
}
A pretty simple custom Exception. The only additional property it has is the ValidationErrors, which is a Dictionary<string, string>. To reiterate, the key is the property name, and the value is the concatenated errors related to that property.
Alrighty, so now we have our services layer setup. We’re using a validator to check for errors, and then throwing if any are found. At this point, if we were to run our app and send an invalid model, the app would explode because we haven’t handled the ValidationException.
Say hello to Global Error Handling!
Implementing a Global Error Handling system on the backend
How many times have you been to some site and seen it blow up with an Exception, in the worst cases, even going so far as to show the stack trace and all?
Well, we’re good developers so screw that! We’re going to handle our exceptions!
Earlier when we looked at the UserController, it extended a custom ApiControllerBase:
[ServiceFilter(typeof(HttpErrorFilterAttribute))]
public class ApiControllerBase : Controller
{
}
We of course need our custom base controller to extend Controller or MVC doesn’t work. But we’ve also set a custom ServiceFilter attribute on it, which uses our custom HttpErrorFilterAttribute, copied below:
public class HttpErrorFilterAttribute : ExceptionFilterAttribute
{
    public HttpErrorFilterAttribute()
    {
        // Because we're setting this up as a service filter, we can access the apps IoC container
        // and use dependency injection here like we would elsewhere.
    }

    public override void OnException(ExceptionContext context)
    {
        bool exceptionHandled = HttpErrorFilterAttribute.TryHandleException(context);
        if (exceptionHandled)
        {
            return;
        }

        // at this point, some other exception was thrown that we havent explicitly handled.
        // take them to some generic error page or something
    }

    private static bool TryHandleException(ExceptionContext context)
    {
        switch(context.Exception)
        {
            case ValidationException validationException:
                foreach (KeyValuePair<string, string> error in validationException.ValidationErrors)
                {
                    context.ModelState.AddModelError(error.Key, error.Value);
                }

                context.Result = new BadRequestObjectResult(context.ModelState);
                return true;
            // include other cases for other exceptions you'd like to explicitly handle globally
            default:
                return false;
        }
    }
}
An ExceptionFilterAttribute gives us hooks to handle Exceptions as they happen. Rather than letting the Exceptions bubble to the frontend unhandled, we can now access the Exception and take care of it by returning a custom HTTP response, redirecting to a general error page, or however else you’d like to handle it.
Also, what’s really cool about using a ServiceFilter is that your custom filter gets complete access to NET Core’s IoC Container. Yep, you can request any objects configured for Dependency Injection in the Startup.cs file in the filter’s constructor and the app will provide them. Just like it did in our UserService and UserValidator.
Our custom HttpErrorFilterAttribute extended ExceptionFilterAttribute so we get its’ OnException(ExceptionContext context) method to work with. When an exception is thrown, this method is called and we get the ExceptionContext, which includes anything you might need to know about the exception.
There’s a custom private method TryHandleException(ExceptionContext context) that we’ve created which takes in the ExceptionContext. Then, we check the type of Exception that it is in a switch statement. If we want to handle a specific exception, add a case statement for it here, like we do with the ValidationException.
We check the internal ValidationErrors dictionary in the ValidationException, and for each error, we add it to the HTTP response’s ModelState errors. Then, we modify the HTTP response to essentially be a Bad Request with the errors as the content.
The private TryHandleException method returns a bool to the caller, indicating simply whether that specific exception was explicitly handle by our custom code or not. If it has, we return out of the OnException method. If it hasn’t been handled, we should still handle the exception, so most likely redirect the user to some general error page or something.
And that’s it for the global error handling! As long as a Controller you create extends our custom ApiControllerBase class, any exceptions thrown by the Controller will automatically have an Exceptions handled. It’s just up to you to explicitly handle specific Exceptions by adding to the handler.
Now that we have the backend’s validation system wired up, lets jump to the frontend and see how this all works!
Using Vanilla JavaScript for Displaying Validation Errors
We’re going to start with plain ole JavaScript to make the initial POST request, receive the validation errors, and display it to the user. We start with this because it’s pretty light-weight code, and as an example that for the simplest of pages, we don’t necessarily need to pull in a large frontend library. We can create basic binding logic ourselves.
Both our Vanilla and Angular examples will display the same UI, and handle errors in the same way. On error:
- The input will have a red border
- The specific error message will be displayed in red, right below the input
- When the user starts changing the input value, the border color returns to normal and the error message disappears
This creates a nice UX for the user, providing a responsive and understandable handling of errors.
Start by opening up Views/Examples/VanillaExample.cshtml.
The page is pretty simple. At the very top, we have references to the Axios JavaScript library which lets us make HTTP Requests using Promises, and then a ref to our custom vanilla JavaScript code for this page.
All the text/password inputs use the same HTML form:
<div class="bv-form-group">
    <label>Username</label>
    <div class="bv-input-container">
        <input class="form-control bv-username" type="text" />
        <span class="bv-error-text"></span>
    </div>
</div>
I’m not going to be copying any Sass files in this post, but the span.bv-error-text starts as hidden, and has color: red. When we get an error for this input, representing a specific property on the model, we add the text to this span element and display it.
There’s two JavaScript files for the Vanilla example.
common.js
const QP = {};

QP.FormService = (() => {
    return {
        setInputUpdateListener: (inputElement) => {
            inputElement.addEventListener('input', event => {
                inputElement.style.borderColor = '#cccccc';
                const errorTextNode = inputElement.nextElementSibling;
                errorTextNode.innerHTML = null;
                errorTextNode.style.display = 'none';
            });
        },
        displayHttpError: (inputElement, errorText) => {
            inputElement.style.borderColor = 'red';
            const errorTextNode = inputElement.nextElementSibling;
            errorTextNode.innerHTML = errorText;
            errorTextNode.style.display = 'block';
        }
    }
})();

QP.HttpService = ((x) => {
    // add axios response interceptor
    x.interceptors.response.use(
        response => response,
        error => {
            if (error.response) {
                const responseErrors = error.response.data;
                const errors = {};
                for (let key in responseErrors) {
                    if (responseErrors.hasOwnProperty(key)) {
                        errors[key] = responseErrors[key][0];
                    }
                }
                return Promise.reject(errors);
            } else {
                return Promise.reject(error);
            }

    });

    return {
        register: (registerModel) => {
            return x.post('/api/User/Register', registerModel);
        }
    }
})(axios);
The FormService is a helper object, providing a couple utility methods to manipulate the DOM.
setInputUpdateListener() sets an event listener on an input, and on change, will remove the red border along with hiding the error message that should be initially displayed below.
displayHttpError() is called on error, and this handles essentially the opposite: displaying a red border and the error message as needed.
Notice all the manual setting of styles and traversing the DOM using nextElementSibling and such. Our next example, using Angular, abstracts all this sort of manual work which will be nice to see!
The HttpService returns a register() function that takes in the user model and makes the HTTP Request to the server using the Axios library. Notice at the top of the service that we’re making use of Axios Interceptors. An Interceptor gives us a hook to modify a request or response before it’s used in our code.
For example, in our case, we’re only using the interceptor to modify the response. When we use axios.Post(), we’re going to get a response from the server that’s either
- a
Guidid string if it succeeded, or - an error object if it failed
The issue is that what we receive from the server isn’t just the data that we want, but it’s the entire HTTP Response. This includes things such as the Status Code, data, etc. Here’s a screenshot of what an unmodified response may look like:
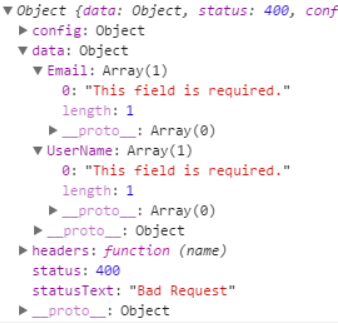
We typically don’t care about things like the status or statusText. What we really want is just what’s in data. Thus, we use the Axios Interceptor to grab only the relevant error information and parse it as necessary. So now, the error returned in the screenshot above would be returned to our `axios.Post().catch()’ as:
{
    Email: 'This field is required',
    UserName: 'This field is required'
}
Lets take a look at the other JavaScript file for the vanilla example.
register.js
((formService, httpService) => {

    const username = document.querySelector('.bv-username'),
        email = document.querySelector('.bv-email'),
        password = document.querySelector('.bv-password'),
        confirm = document.querySelector('.bv-password-confirm'),
        register = document.querySelector('.bv-register-btn');

    formService.setInputUpdateListener(username);
    formService.setInputUpdateListener(email);
    formService.setInputUpdateListener(password);
    formService.setInputUpdateListener(confirm);

    const errorHandler = (error) => {
        if (!!error.UserName) {
            formService.displayHttpError(username, error.UserName);
        }
        if (!!error.Email) {
            formService.displayHttpError(email, error.Email);
        }
        if (!!error.Password) {
            formService.displayHttpError(password, error.Password);
        }
        if (!!error.ConfirmPassword) {
            formService.displayHttpError(confirm, error.ConfirmPassword);
        }
    };

    register.addEventListener('click', () => {
        const registerModel = {
            UserName: username.value,
            Email: email.value,
            Password: password.value,
            ConfirmPassword: confirm.value
        };

        httpService
            .register(registerModel)
            .then(newUserId => {
                console.log(`Successfully created new user with id ${newUserId}.`);
            })
            .catch(errorHandler);
    });

})(BV.FormService, QP.HttpService);
This JavaScript file has a bit more going on, lets walk through it. Our code uses the two services we went through, QP.FormService and QP.HttpService
We start by query the DOM and getting a reference to all the inputs. Then, we use our FormService to add the input change event listeners mentioned earlier.
We also create a custom error handling function. This function simply takes in the error object returned from the server’s HTTP response, and displays it in the UI using the FormService’s displayHttpError utility function.
Finally, we add our event handler for when the user hits the Register button. It simply creates the model using the current input values, then uses our HttpService to send it off.
Go ahead and try testing the UI. Leave things blank, use already taken Emails and UserNames, and mismatch the password fields. For references, here’s the list of existing users we hardcoded earlier in the backend code:
var users = new List<UserAdd>
{
    new UserAdd
    {
        Email = "bob@test.com",
        UserName = "Bob"
    },
    new UserAdd
    {
        Email = "mary@test.com",
        UserName = "Mary"
    },
    new UserAdd
    {
        Email = "tom@test.com",
        UserName = "Tom"
    }
};
Sweet! That’s it for our vanilla example. Lets check out how we could handle this using some modern frontend library.
Using Angular 1.X for Displaying Validation Errors
This section assumes you’re familiar with Angular 1.X.
The vanilla examples works fine and all, but it’s fairly brittle. If we were to modify the HTML of an input group, we’d have to modify the FormService functions so it can reference the elements correctly and target the right ones.
When we use a frontend library or framework, such as Angular, we no longer need to worry about wiring up our javascript code to the DOM. They handle this for you, so we can focus on the core application logic revolving around the business logic and domain.
For the Angular example, we only have one file in Scripts/Angular/register.js. It’s a little longer so we’ll walk through it, but here it is for now (I’m making use of ES2015 classes as an added bonus, in case you’ve never used them before):
const app = angular.module('angularExampleApp', []);

class AngularInputFormDirective {
    constructor() {
        this.templateUrl = 'angular-input-form-template.html';
        this.restrict = 'A';
        this.scope = {
            value: '=angularInputForm',
            label: '@label',
            error: '=error',
            inputType: '@inputType'
        };
    }
}

// We create a wrapper around angular's $http so we can modify the
// response/error before returning to the caller. This is analagous to
// our usage of axios's http interceptors in the vanilla js example.
class HttpService {
    constructor($http, $q) {
        this.$http = $http;
        this.$q = $q;
    }

    post(url, model) {
        return this.$http.post(url, model)
            .then(response => {
                return response.data;
            })
            .catch(error => {
                for (let key in error.data) {
                    if (error.data.hasOwnProperty(key)) {
                        error.data[key] = error.data[key][0];
                    }
                }
                return this.$q.reject(error.data);
            });
    }
}

class UserService {
    constructor(httpService) {
        this.httpService = httpService;
    }

    register(user) {
        // user must be pascal cased to match backend models
        const model = {
            UserName: user.userName,
            Email: user.email,
            Password: user.password,
            ConfirmPassword: user.confirmPassword
        };

        return this.httpService.post('/api/User/Register', model);
    }
}

class Controller {
    constructor(userService) {
        this.userService = userService;

        this.model = {
            userName: null,
            email: null,
            password: null,
            confirmPassword: null
        };

        this.errors = {};
    }

    register() {
        this.userService.register(this.model)
            .then(newUserId => {
                console.log(`Successfully registered new user with id ${newUserId}.`);
            })
            .catch(errors => {
                this.errors = errors;
            });
    }
}

app
    .directive('angularInputForm', () => new AngularInputFormDirective())
    .service('httpService', [
        '$http', '$q',
        ($http, $q) => new HttpService($http, $q)
    ])
    .service('userService', [
        'httpService',
        (httpService) => new UserService(httpService)
    ])
    .controller('controller', [
        'userService',
        (userService) => new Controller(userService)
    ]);
The AngularInputFormDirective simply takes in a value that’s binded to a text/password input. The value passed in by reference should be one of the User model’s properties such as UserName or Email. The label and inputType passed in are used for rendering purposes. The error is binded to some error value that’ll live in the Angular controller. When that error object on the controller is populated with errors returned from the server, our directive and input component will automatically be updated to display the red input border and error message since we have this binding setup.
Here’s the directive template, which can be found in Views/Examples/AngularExample/cshtml:
<script type="text/ng-template" id="angular-input-form-template.html">
    <div class="angular-input-form-container">
        <div class="bv-form-group" data-ng-class="{'error': !!error}">
            <label ng-bind="label"></label>
            <div class="bv-input-container">
                <input ng-model="value"
                        class="form-control"
                        type=""
                        ng-change="error = null;" />
                <span class="error-text" ng-bind="error"></span>
            </div>
        </div>
    </div>
</script>
There’s some interesting points to discuss regarding the above template:
- We use the
ng-classattribute to set anerrorclass if an error for this directive exists. This class is set so we can style the input, adding a red border. - We also use the
ng-changeattribute on the input. When the user changes the value of the input, we automatically set theerrorassociated to this directive tonull. This removes theerrorclass from the form group since that’s dynamically and conditionally appended depending on the existence oferror. - The error message is injected into the DOM using
ng-bind="error". If an error exists, thespanwill display with the error. If not, the span will not exist in the DOM.
Next in our Angular code is the HttpService. Remember how we used Axios Interceptors in our vanilla example?
Well, Angular ships with $http, which allows us to make Promise-based HTTP requests out of the box. However, we still have the same issue where the server returns a bunch of information in a HTTP response that we dont care about. So we create our own Angular Service that’s essentially a wrapper around $http so we can parse the error and return it in the format we want.
UserService holds the function we’ll use to make the registration HTTP call and it, of course, uses our HttpService to do so.
The Controller sets up an empty model on page load, and an empty errors object. If there are validation errors upon trying to register, the errors are caught, modified as we need in HttpService and returned to the catch block, and then we set the controller’s errors object. Because we used a directive to create bindings to the errors object, the errors we have automatically flow into the UI and we get the same visual result as we did in the vanilla example!
Closing Remarks
Hope this walkthrough has been useful for you. We’ve gone through the process of creating a fairly simple global validation system that ranges the full stack. The good news is that it’s simple to understand, but also robust enough to be extensible as needed.
As a last note, when it comes to validations, always make sure that you AT LEAST have validations on the backend. Sometimes it’s nice to include some lighter validations on the frontend, which potentially saves a round-trip to and from the server. However, anything on the frontend can be modified by malicious attacker. You shouldn’t trust any data coming from the front end and thus need to completely validate everything on the backend.
Thanks for reading!